A Guide to using GitHub for Hacktoberfest
If you want to participate in Hacktoberfest, but you don't have much experience with GitHub, then you've come to the right place.


Hacktoberfest is a great opportunity for new developers to make contributions to real world projects and get involved with the communities that maintain those projects. All of this happens through the GitHub code hosting service. That can be a hurdle for anyone who's not familiar with Git or GitHub. If you want to participate in Hacktoberfest, but you don't have much experience with GitHub, then you've come to the right place.
References
I wrote this post to accompany a talk/workshop. Here are links to the associated materials.
Slides (https://1drv.ms/p/s!Ans6P2_j9TSzuBe3H5F8QWSdwjQS?e=bmwJwJ)
Video (Coming soon)
Before I get into the main focus of this post, I need to address part of the role GitHub has chosen to play in the world. GitHub contracts directly with the United States' Immigration and Customs Enforcement (ICE) agency. ICE is the primary agency responsible for imprisoning refugee families in concentration camps in the United States. This includes children. Many of those children have even been separated from their families with no record of where they went or whose child they are. Throughout the COVID-19 pandemic, ICE has continued to imprison even more people in crowded and unsanitary conditions, and withheld even basic medical care. Not that it matters, but the people they have imprisoned have not been convicted of any crimes. Recall that many of them are children. In nearly all cases, the only crime they're even accused of is entering the country illegally, which is a misdemeanor. And in fact shortly after I initially wrote this post, news broke that some ICE facilities have been forcibly sterilizing women in their custody. These things are attrocities. I believe that they even constitute genocide.
I'm calling attention to this reality now, because GitHub knows this. GitHub has vigorously defended their choice to directly support the organization commiting these attrocities. I have deep reservations about recommending that anyone use GitHub's services. In fact, I urge you not to as much as you can. Look for other platforms to host your version control service whenever you have any choice in the matter. Tech is not neutral. When we pretend otherwise, we abdicate our judgement and our ethics to the world's oppressors.
If you want to use a different version control hosting service, here are some less harmful alternatives. Please look into your options and choose the one that's best for you.
- Gitlab
- Sourceforge
- Jetbrains Space (invite only beta, as of September 2020)
- Gittea (self-hosted)
- Gogs (self-hosted)
Having said all that, I want to explain why I'm publishing this article anyway. Simply, tech is still one of the best paths to financial stability available to many people. The Hacktoberfest event is one of the most accessible ways for newcomers to the field to gain experience and begin to build a personal network and a career in tech. I think the best thing I can do is try to support that effort. I can't stop what's happening today. I can work toward a future where the people and communities who are subjected to technology have an equitable say in who can use it and how it's used.
Git Basics
We're going to be working in Git, so I want to take a minute to first make sure everyone has a basic understanding of how to even do that. If you're already a Git expert, then you can safely skip this section. And if you're completely new to Git, you should probably spend some time with a dedicated Git tutorial first. This section is intended for people with at least a little bit of experience using Git.
For an interactive tutorial, I recommend https://learngitbranching.js.org/
If you prefer a video tutorial, I highly recommend this one from Scott Hanselman.
Repository
First: repositories. In Git, a repository is a copy of the code base and all of its history. When you first set up your local works space, you probably did it by using git clone. That command contacts an existing repository and makes a copy of it locally. When I say it makes a local copy, I mean a copy of everything. All of the code, the history, the branches, the commit messages, everything. It's a complete duplicate copy of everything on your local machine. This means you can make all sorts of changes very fast and without affecting anyone else you may be collaborating with.
Commit
Commits are the fundamental data structure within Git. Everything else is built up from them. A commit is essentially a snapshot of the code base at one moment in time. As you work and make changes, you can commit them to Git. Once they're committed, you can restore that version of single files or the whole code base any time in the future.
Branch
Git stores commits in order as a history. A branch represents a parallel track in that history. Changes in one branch will be kept separate from any other branches. You can compare or even switch between branches easily. This lets you work on larger features over a longer period of time without disrupting other tasks. When you're ready, you can merge one branch into another. This can allow you to keep a side branch up to date with the main branch. Or it can bring changes from the side branch into the main one.
Push and Pull
Pushes and Pulls are how to transfer commits between repositories. Remember that after the original clone, your local repository is it's own complete independent repository. Commits and branches made in that local repository only exist there. You can do a push to send those commits back to the original remote repository. You can likewise do a pull to bring in changes that other people have made into your local repository.
GitHub Basics
Git is a version control system. The role it plays is to store and preserve the history of all the work you do over time in your code. GitHub is a service that hosts git repositories and provides a number of extras on top of Git's core features. There are a lot of extras, but two of them will be critical for working on open source projects and participating in Hacktoberfest.
Fork
A fork is a clone of another repository that exists on a remote server. When you create a fork, what happens is that internally GitHub clones the original repository and sets up that clone as a new remote repository for you to use. You can then clone from that fork, and make commits, push and pull all just like with any other remote repository.
Pull Request
A pull request is exactly what it sounds like. It is a request for someone to perform a pull. This pull can either be from a branch in the same repository or from a forked repository. This is the mechanism that allows people to make contributions to open source projects. This feature is also used within established teams to enable performing code review with each other. When someone opens a pull request, GitHub creates a comparison view—called a diff—that allows the reviewers to easily compare the changes between the two branches.
Workflow for Hacktoberfest

Now that we're all on the same page with the basic features of of Git and GitHub, we'll walk through some scenarios and put it all together so you'll be ready to contribute during Hacktoberfest and beyond. For the purpose of this tutorial, I will mainly refer to Git CLI commands when performing actions in Git. There are GUI tools available, and if you're more comfortable with those they will work just as well. However, those tools often obscure what is happening with Git behind the scenes. That's a problem for a tutorial. They are also very much a matter of preference, and I prefer not to use them most of the time. If you find yourself wanting a GUI tool, then I recommend using the one that is built into your IDE of choice. If you don't use an IDE and want a standalone tool, I think Sourcetree from Atlassian is the best place to start.
Step One: Fork
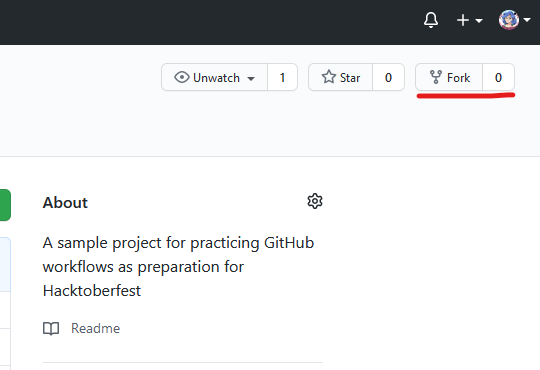
It's possible to work on your own projects, but the idea of Hacktoberfest is that you would contribute to an open source community. Typically you would first find a repository for the project you want to contribute toward. Then create a fork of that repository through the GitHub UI. As of September 2020, the button to fork is in the top right corner of the page.
I have created a simple app to use for demonstration purposes in this article. You're welcome to also use it for practice if you like. You can find it at https://github.com/jenniferplusplus/hello-hacktoberfest
Step Two: Clone
Forking the original repository creates a cloned copy of it under your account. You can now clone that copy to your local computer in order to make edits, build, test, and generally do software development. To clone to your local computer, you will need the git repository URL. GitHub provides it for you through the UI by clicking the green Code button, at the top of the file list in the code tab on the repository. Copy that URL, and then use it to run the git clone command in a terminal on your computer to clone a local copy to work on.
git clone https://github.com/YOUR_ACCOUNT/YOUR_REPOSITORY.git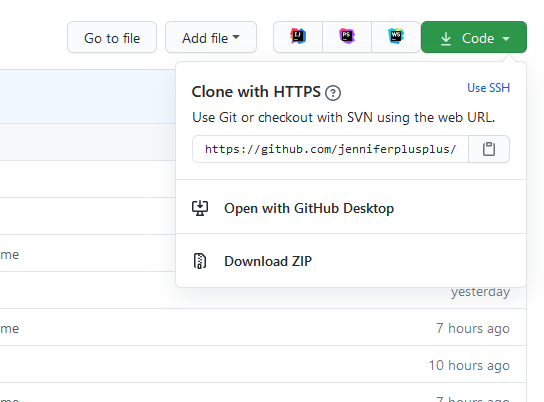
Step Three: Code
Once the clone finishes, you will have all of the files and history copied locally on your computer. You can now start making the changes for your contribution to the project. Many contributions will be small and quick, but others will be bigger. When working on a bigger change, it's best to commit often. This will help to prevent losing any work, and it allows you to easily restore to a previous state if you decide you need to do that.
If you're working on the demonstration app that I built, then a simple change you can make is to just add your name to the list of names in the "hello world" sequence. If you do that, and run the application, your name would then appear in the sequence along with the others. Building, developing, and running this app is not the focus of the article, but there are some basic instructions in the project's README.md file.
Step Four: Commit
When you've done some work that you want to keep, you need to commit the changes. This saves that version of the code into the git repository, and you can restore or review it later if you ever need to. Commiting is a two step process. First, you have to select all of the files you want to include in this commit. It's possible to exclude some of your changes and only commit others. However, this is complicated and error prone. It's best not to make a habit of that. You do this with Git's add command.
git add ./path/to/file

# OR to add every change in your current directory

git add .
Then you can commit the changes. When you make a commit, you need to include a commit message. This is a description of the commit and it will be visible when you look through the history of commits in your repository. What makes up a good commit is a matter of heated debate, so I won't get into it. The important thing is that you would have some idea what the commit changed and/or why it changed if you have to read the commit messages later on. If you leave off the -m flag and the message string, then Git will open a text editor for you and you can write your commit message there instead.
git commit -m "A descriptive commit message"Often you will want to just commit everything that you've changed all at once. You can skip add and do that in a single commit command by adding the --all flag.
git commit -m "A descriptive commit message" --allStep Five: Push
At this point, you've made some changes and commited them. You might even have made multiple commits if you're working on a larger change. Any commit you've made so far only exists in your local repository. To share them with your team and contribute to the community, you need to push them up to your remote repository. This is done with the push command.
git pushIf you work on real projects over the long term, you will likely wind up creating some branches to organize that work. If you're dealing with multiple branches, that can complicate the push command. But, that's a more advanced topic than I'm trying to cover here. It's good to be aware of, but that's all. If you've followed this guide up to now, then a simple push is all you have to do. When you do the push, git will likely ask you for your login credentials to access GitHub. This is normal, and it's safe to provide them.
Step Six: Pull Request
This is the final step. Everything you've done up to this point has only really been accessible to you. When you create a pull request, that begins the process of sending your back back to the original project. Hacktoberfest requires you to create pull requests in order to complete the event. This is because pull requests are a critical point in the process of contributing to most open source projects. They provide an opportunity to perform code review. They also enable various automated actions to be performed, such as executing unit tests or performing security analysis.
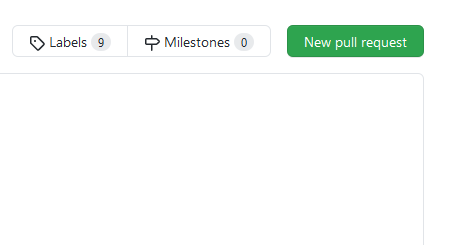
To create your pull request, go back to your repository in the GitHub UI, and open the Pull Requests tab. Then click on the New pull request button near the top right of the screen.
GitHub will give you a chance to review the changes you've made before you finally create the pull request. You will also have a chance to change where to send this pull request. This is important to check if you're working with branches. But most of the time the default options will be correct. And if you've followed this guide, then the defaults should be correct in this case, too. When you're ready, click the button labeled Create pull request.
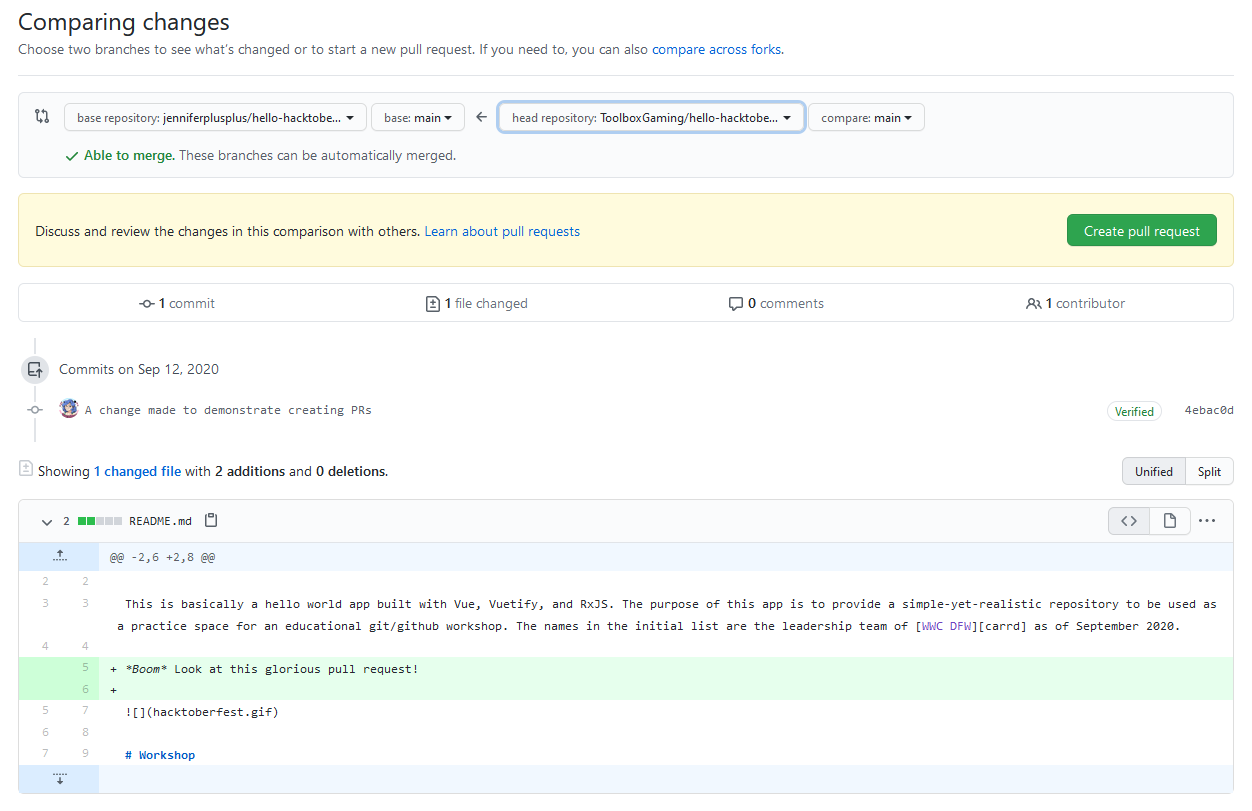
🎉Congratulations! You've created a pull request!🎉
Cover photo by Soulful Pizza